States and Lifecycle
Consider the ticking clock example from one of the previous sections. In Rendering Elements, we have only learned one way to update the UI. We call ReactDOM.render() to change the rendered output:
function tick() {
  const element = (
    <div>
      <h1>Hello, world!</h1>
      <h2>It is {new Date().toLocaleTimeString()}.</h2>
    </div>
  );
  ReactDOM.render(
    element,
    document.getElementById('root')
  );
}

setInterval(tick, 1000);
In this section, we will learn how to make the Clock component truly reusable and encapsulated. It will set up its own timer and update itself every second. We can start by encapsulating how the clock looks:
function Clock(props) {
  return (
    <div>
      <h1>Hello, world!</h1>
      <h2>It is {props.date.toLocaleTimeString()}.</h2>
    </div>
  );
}

function tick() {
  ReactDOM.render(
    <Clock date={new Date()} />,
    document.getElementById('root')
  );
}

setInterval(tick, 1000);
However, it misses a crucial requirement: the fact that the Clock sets up a timer and updates the UI every second should be an implementation detail of the Clock. Ideally we want to write this once and have the Clock update itself:
ReactDOM.render(
  <Clock />,
  document.getElementById('root')
);
To implement this, we need to add “state” to the Clock component. State is similar to props, but it is private and fully controlled by the component.
We mentioned before that components defined as classes have some additional features. Local state is exactly that: a feature available only to classes.
Converting a Function to a Class
class Clock extends React.Component {
  render() {
    return (
      <div>
        <h1>Hello, world!</h1>
        <h2>It is {this.props.date.toLocaleTimeString()}.</h2>
      </div>
    );
  }
}
Above within the Class, we have a method call render(). This method contains the definition of UI and it must return that UI. And all the props should be accessed using this instance. The class must extend React.Component
Clock is now defined as a class rather than a function.
The render method will be called each time an update happens, but as long as we render <Clock /> into the same DOM node, only a single instance of the Clock class will be used. This lets us use additional features such as local state and lifecycle hooks.
The above example has little goof, let's realize in the next example.
Adding Local State to a Class
class Clock extends React.Component {
  constructor(props) {
    super(props);
    this.state = {date: new Date()};
  }

  render() {
    return (
      <div>
        <h1>Hello, world!</h1>
        <h2>It is {this.state.date.toLocaleTimeString()}.</h2>
      </div>
    );
  }
}

ReactDOM.render(
  <Clock />,
  document.getElementById('root')
);
States are added via Constructor methods. The constructor must accept props as the arguments. In the above example, props is empty or undefined.
Next, the constructor must call base class's constructor with props as the arguments.
The above example only display the current time but it won't update the time every second. We will make the Clock livable by adding lifecycle hooks.
Adding Lifecycle Methods to a Class
In applications with many components, it’s very important to free up resources taken by the components when they are destroyed.
We want to set up a timer whenever the Clock is rendered to the DOM for the first time. This is called mounting in React.
We also want to clear that timer whenever the DOM produced by the Clock is removed. This is called unmounting in React.
We can declare special methods on the component class to run some code when a component mounts and unmounts:
class Clock extends React.Component {
  constructor(props) {
    super(props);
    this.state = {date: new Date()};
  }

  componentDidMount() {

  }

  componentWillUnmount() {

  }

  render() {
    return (
      <div>
        <h1>Hello, world!</h1>
        <h2>It is {this.state.date.toLocaleTimeString()}.</h2>
      </div>
    );
  }
}
These methods(componentDidMount() and componentWillUnmount()) are called lifecycle hooks.
The componentDidMount hook runs after the component output has been rendered to the DOM. This is a good place to set up a timer:
componentDidMount() {
    this.timerID = setInterval(
      () => this.tick(),
      1000
    );
}
Note how we are stoing the timer id. We are directly using this.timerId without declaring timerId in the constructor. This is one of the React's advantage. You can add as many state anywhere as you want.
We will tear down the timer in the componentWillUnmount lifecycle hook:
componentWillUnmount() {
  clearInterval(this.timerID);
}
Finally, we will implement a method called tick() that the Clock component will run every second. It will use this.setState() to schedule updates to the component local state:
class Clock extends React.Component {
  constructor(props) {
    super(props);
    this.state = {date: new Date()};
  }

  componentDidMount() {
    this.timerID = setInterval(
      () => this.tick(),
      1000
    );
  }

  componentWillUnmount() {
    clearInterval(this.timerID);
  }

  tick() {
    this.setState({
      date: new Date()
    });
  }

  render() {
    return (
      <div>
        <h1>Hello, world!</h1>
        <h2>It is {this.state.date.toLocaleTimeString()}.</h2>
      </div>
    );
  }
}

ReactDOM.render(
  <Clock />,
  document.getElementById('root')
);
We have defined a method called tick() which uses this.setState() to update the state value. Note that the method setState is the method of the base class. The only way to update the state of a component is by using setState() method.
In the above example, when the component is mounted, we set a timer that runs every second and calls tick method. This method uses setState method to update the date state. Now whenever the date changes, React update the necessary part of the DOM automatically.
Use State Correctly
There are three things you should know about setState().
Do Not Modify State Directly
For example, this will not re-render a component:
// Wrong
this.state.comment = 'Hello';
Instead, use setState():
// Correct
this.setState({comment: 'Hello'});
The only place where you can assign this.state is the constructor.
Even the above way is not proper way to use setState method. The reason is below -
State Updates May Be Asynchronous
React may batch multiple setState() calls into a single update for performance. Because this.props and this.state may be updated asynchronously, you should not rely on their values for calculating the next state.
The first thing to be aware of is the fact that the setState function in React works in an asynchronous fashion. That might trip some developers up, as the state values are not immediately available after the update. There are two variations of using setState: the object-based approach and the functional approach. We have already discussed about object based approach which is not proper way to update state as state updates are asynchronous. So we must rely on the function approach. The problem of using object approach is discussed below. Consider the following -
class App extends React.Component {
   constructor() {
     super();
     this.state = {
       value: 0,
       message: 'default click state'
     }
   }

   onClick = () => {
     this.setState({
       value: this.state.value + 1
     });

     this.setState({
       message: `click-state ${this.state.value}`
     });
   }


   render(){
     return(
       <div>
         <div>render->state={this.state.value} -
             {this.state.message}
         </div>
         <button onClick={this.onClick}>Click-setState</button>

       </div>
     );
   }
}

ReactDOM.render(
  <App />,
  document.getElementById("root")
);
If you consider the above example the output is not what we expected. The above code, when executed, renders the value and message from the state object and also renders a button. If you take a look at the click handler, we have two consecutive setState functions that access the this.state value. The behavior we are expecting is that when the button is clicked, the correct state value should be rendered in the below div (extracted for reference):
<div>render->state={this.state.value} -
     {this.state.message}
</div>
The this.state.message contains values from this.state.value. We are expecting that both state values should be the same when the button is clicked. After the first click we expect the below output -
render->state=1 -click-state 1
But, instead we get the following -
render->state=1 -click-state 0
On the second click, the output still mismatches as shown below.
render->state=2 -click-state 1
Since the setState call is asynchronous before the first setState execution may be completed, the reference to the second setState may point to the previous value and not the first current updated one.
We’ll fix this by using the functional aspect of setState. To demonstrate the fix, let’s create one more button:
<button onClick={this.onClickfn}>Click-setState fn</button>

onClickfn = ()=> {
  this.setState((prevState, props) => ({
    value : prevState + 1
  }));
  this.setState((prevState, props) => ({
    message : `click-state ${prevState.value}`
  }));
}
This function takes two parameters as arguments: the first is the prevState, and the second is the props (in case you need props as well, which is passed from the parent component). Here we are only looking into the prevState. The prevState above relates to the setState function as it is the last updated state. This will always point to the correct value.
Let’s see the output after couple of clicks. You will find that the values are always in sync when you click the second button. In the above example, you can see that using the functional setState parameter correctly batches the previous state, and you get predictable state values.
One more caveat we need to be aware of: setState() takes one more callback function, which is executed once the state values are successfully updated. This is very handy in a situation where you have to do some operation once setState successfully updates.
Let’s see a final example.
Assume we want to log the state value after the update, and we write the code as below. I will use the onClickfn() handler for this.
<button onClick={this.onClickfn}>Click-setState fn</button>

onClickfn = ()=> {
  this.setState((prevState, props) => ({
    value : prevState + 1
  }));
  this.setState((prevState, props) => ({
    message : `click-state ${prevState.value}`
  }));

  console.log(`After Update : ${this.state.value}`);
}
But lets see the console.log and verify whether the value is correct or not. After three clicks, you get this status:
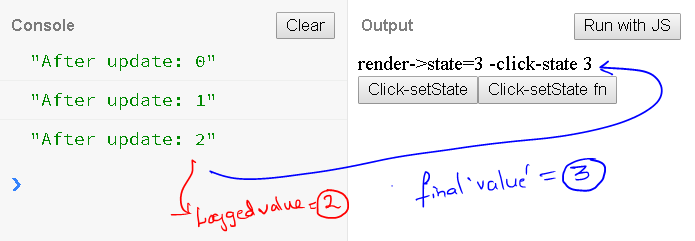
You will observe that the logged value is not the last updated value. Let’s fix this and see the output.
<button onClick={this.onClickfn}>Click-setState fn</button>

onClickfn = ()=> {
  this.setState((prevState, props) => ({
    value : prevState + 1
  }));
  this.setState((prevState, props) => ({
    message : `click-state ${prevState.value}`
  }), () => {
    console.log(`After Update : ${this.state.value}`);
  });
}
In the above example, we are using the setState() second callback parameter. This callback will be executed once the setState() has completed its operation. Let’s see the final output with the above modified code.

State Updates are Merged
When you call setState(), React merges the object you provide into the current state.
For example, your state may contain several independent variables:
constructor(props) {
  super(props);
  this.state = {
    posts: [],
    comments: []
  };
}
Then you can update them independently with separate setState() calls:
  componentDidMount() {
    fetchPosts().then(response => {
      this.setState({
        posts: response.posts
      });
    });

    fetchComments().then(response => {
      this.setState({
        comments: response.comments
      });
    });
  }
The merging is shallow, so this.setState({comments}) leaves this.state.posts intact, but completely replaces this.state.comments.
The data flows down
Neither parent nor child components can know if a certain component is stateful or stateless, and they shouldn’t care whether it is defined as a function or a class. This is why state is often called local or encapsulated. It is not accessible to any component other than the one that owns and sets it.
A component may choose to pass its state down as props to its child components:
<h2>It is {this.state.date.toLocaleTimeString()}.</h2>
This also works for user-defined components:
<FormattedDate date={this.state.date} />
The FormattedDate component would receive the date in its props and wouldn’t know whether it came from the Clock’s state, from the Clock’s props, or was typed by hand:
function FormattedDate(props) {
  return <h2>It is {props.date.toLocaleTimeString()}.</h2>;
}
In React apps, whether a component is stateful or stateless is considered an implementation detail of the component that may change over time. You can use stateless components inside stateful components, and vice versa.